Mastering the Perfect White Chocolate Raspberry Cheesecake: Creamy, Crack-Free, Crispy
Indulge in a slice of pure dessert heaven with the ultimate
white chocolate raspberry cheesecake. This isn't just any cheesecake; it's a masterpiece designed for unparalleled creaminess, a pristine crack-free surface, and a satisfyingly crispy crust that stands up to every bite. While the idea of creating such a perfect cheesecake might seem ambitious, as one source suggests, we're here to demystify the process, sharing expert insights and techniques that ensure your homemade creation rivals any professional bakery. Get ready to impress with a dessert that balances the rich sweetness of white chocolate with the vibrant tang of fresh raspberries, all cradled in a golden graham cracker shell.
The Foundation of Flavor: Crafting the Crispy Graham Cracker Crust
Every exceptional cheesecake begins with an outstanding crust. Our goal is not just a base, but a truly *crispy* foundation that complements the luxurious filling without becoming soggy. This essential component sets the stage for the entire dessert experience.
To achieve this perfect crust, you'll need:
- Graham Cracker Crumbs: Start with quality graham crackers, typically around 12 double crackers, crushed finely to yield about 2 cups of crumbs. Uniform crumbs ensure an even texture.
- Melted Unsalted Butter: About 8 tablespoons of melted unsalted butter acts as the binding agent, providing richness and helping the crust crisp up.
- Sugar: A modest 1/3 cup of sugar adds a touch of sweetness, enhancing the graham cracker flavor without overpowering it.
The technique is as crucial as the ingredients. In a medium bowl, combine the graham cracker crumbs, melted butter, and sugar. Mix thoroughly until the crumbs are evenly moistened and resemble wet sand. This ensures every particle has a chance to bake into a cohesive, crispy layer.
Preparation and Baking:
Press this mixture firmly and evenly over the bottom of a 9-inch springform pan. The "springform" pan is vital as it allows for easy removal of the cheesecake later. Place the pan on a baking sheet – this prevents any potential butter leakage and makes transferring the pan much easier. Bake the crust at 350°F (175°C) for 12 to 15 minutes, or until it's beautifully golden brown. This pre-baking step is *critical* for preventing a soggy crust, allowing it to develop a sturdy, crisp texture before the moist filling is added. Once baked, set the pan on a rack to cool. Once it's cool enough to handle, a little secret for an easy release later: lightly grease the sides of the pan *above* the crust. This creates a non-stick barrier for the cheesecake filling.
The Heart of the Cheesecake: Creamy, Crack-Free Perfection with No Water Bath
The filling is where the magic truly happens, transforming simple ingredients into a velvety smooth, intensely flavorful experience. Our focus here is on achieving that desirable creamy texture and, crucially, avoiding any unsightly cracks on the surface. We'll employ a brilliant "no water bath" method paired with progressive cooling to achieve flawless results. For more in-depth guidance on this technique, check out
Mastering White Chocolate Raspberry Cheesecake: No Water Bath for Flawless Finish.
Key Ingredients and Their Role:
- High-Quality White Chocolate: Two 8-oz bars of a premium white baking bar (like Ghirardelli Classic White) are essential. The quality of your white chocolate directly impacts the richness and flavor profile of your cheesecake. It’s melted using boiling water, then whisked until smooth and thoroughly blended. This creates a luxurious, pourable base that will seamlessly incorporate into the cream cheese.
- Room Temperature Cream Cheese: Four 8-oz packages (2 pounds total) of full-fat cream cheese, *at room temperature*, are non-negotiable. Cold cream cheese will result in a lumpy filling and require excessive beating, which introduces too much air.
- Sugar, Vanilla, and Salt: 3/4 cup sugar, 1 tablespoon vanilla extract, and 1/4 teaspoon salt balance the flavors perfectly.
- Large Eggs: Three large eggs, also at room temperature, act as a binder and help set the cheesecake.
Mixing for Smoothness, Not Air:
The art of a crack-free cheesecake lies in gentle mixing. Begin by beating the room temperature cream cheese in a large bowl just until smooth (about 45 seconds). Overbeating at this stage can incorporate too much air, which expands during baking and contracts during cooling, leading to cracks. Next, add the sugar, vanilla, and salt, beating just until smooth again (about 1.5 minutes), making sure to scrape down the bowl and beaters once or twice.
Now, for the eggs: beat them in one at a time, *just until blended*. The key is minimal beating after the eggs are added. Use a rubber spatula to thoroughly stir the melted white chocolate mixture into the cream cheese filling. This ensures every part of the filling is infused with that wonderful white chocolate flavor without over-mixing. Scrape the velvety filling evenly over your pre-baked, cooled crust.
Baking Without a Water Bath & Progressive Cooling:
Reduce your oven temperature to 300°F (150°C). Bake the cheesecake on the baking sheet for 60 to 70 minutes. The cheesecake is ready when the edges are visibly puffed, but the center still jiggles like tender gelatin when the pan is gently shaken. This subtle jiggle indicates it’s cooked through but still incredibly moist.
The "no water bath" method works by providing a stable, dry heat environment, which, when combined with *progressive cooling*, drastically reduces the risk of cracks. Once baked, turn off the oven and prop the oven door open slightly, allowing the cheesecake to cool gradually inside the warm oven for about an hour. This slow transition from high heat prevents thermal shock, a common cause of cracks.
After this initial cooling, set the pan on a rack. Carefully slide a thin paring knife around the upper edges of the cake to detach it from the pan, but *do not remove the pan sides yet*. This gentle separation also helps prevent cracks as the cake cools further and shrinks slightly.
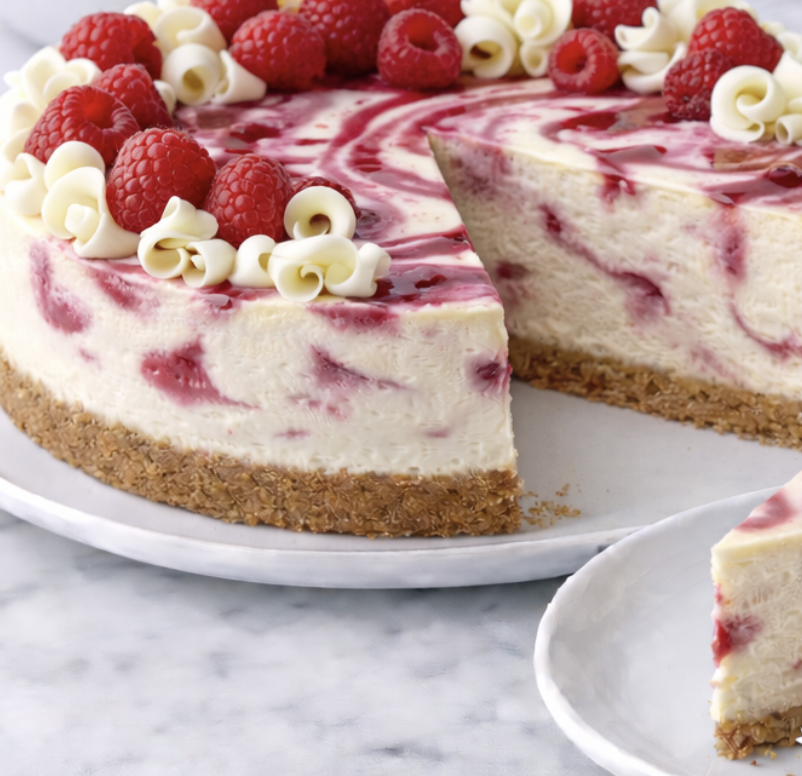
The Vibrant Crown: Crafting the Raspberry Topping and Fresh Berry Arrangement
The vibrant crimson of the raspberry topping is the perfect counterpoint to the creamy white chocolate, both visually and in taste. This optional, but highly recommended, topping elevates the cheesecake to a truly gourmet experience.
Crafting the Raspberry Puree:
You'll need about half of your fresh raspberries (around 2-2.5 cups, or two 6-oz cartons), 1/4 cup sugar, and 2 teaspoons cornstarch. Puree the raspberries, and if necessary, add a touch of water to make a full cup of puree. In a small non-reactive saucepan, whisk the cornstarch into the raspberry puree until smooth. Bring this mixture to a simmer over medium-high heat, stirring constantly. Continue to simmer for 1.5 to 2 minutes, stirring continuously, until the puree has visibly thickened and deepened in color. Set this beautiful raspberry topping aside to cool completely.
Once your cheesecake is thoroughly chilled (more on that next), uncover it and carefully remove the sides of the springform pan. If the top of the cake feels moist, gently blot it with a dry paper towel. Scrape the now-cooled raspberry topping onto the cold cheesecake and spread it evenly across the surface. For an even grander presentation, arrange the remaining fresh raspberries artfully on top of the spread topping.
Alternatively, if you prefer a baked-in "raspberry swirl" rather than a topping, you can gently dollop the pureed raspberry mixture onto the plain cheesecake filling before baking, then use a knife or skewer to create elegant swirls. This offers a different aesthetic and integration of flavor.
The Art of Patience: Chilling, Serving, and Storage for Ultimate Flavor
You've put in the effort, now comes the hardest part: waiting. But this waiting period is crucial for the cheesecake to fully set, develop its rich flavor, and achieve that iconic dense, creamy texture. This is often the most underestimated step in cheesecake making. For even more expert insights and a detailed recipe, check out
Unlock the Best White Chocolate Raspberry Cheesecake: Expert Tips & Recipe.
Thorough Chilling:
Once the cheesecake has cooled to room temperature, loosen the sides of the pan but do not remove them. Refrigerate the cake until it is thoroughly cold before covering it tightly with plastic wrap. For the absolute best flavor and texture, aim for at least 8 hours of refrigeration, though 24 to 36 hours is truly ideal. This extended chilling time allows the flavors to meld beautifully and the structure to firm up completely, making for easier, cleaner slicing.
Serving Perfection:
When you're ready to serve, remove the cheesecake from the refrigerator about 20-30 minutes beforehand to allow it to soften slightly, enhancing its creamy mouthfeel. For pristine slices, use a sharp, thin knife dipped in hot water and wiped clean between each cut. This prevents sticking and leaves you with picture-perfect wedges.
Storage and Freezing:
Store any leftover cheesecake, covered with plastic wrap, in the refrigerator for up to 3-4 days. For longer storage, cheesecake freezes remarkably well. Once completely chilled and firm, wrap individual slices or the entire cheesecake (without the fresh berry topping) tightly in plastic wrap, then in foil. It can be frozen for up to 1-2 months. Thaw overnight in the refrigerator before serving.
Conclusion
Crafting the perfect
white chocolate raspberry cheesecake is a rewarding culinary journey. By understanding the nuances of each step – from creating a truly crispy crust to ensuring a crack-free, creamy filling with our no-water-bath method and progressive cooling, and finally, adding a vibrant raspberry flourish – you're set to create a dessert that will delight and impress. This cheesecake isn't just a treat; it's a testament to thoughtful baking, delivering a harmonious blend of textures and flavors in every unforgettable bite. So, gather your ingredients, embrace the process, and prepare to enjoy the sweet success of your own perfect creation.